2nd Gen 4Runner Headlights: The Complete LED Upgrade Guide
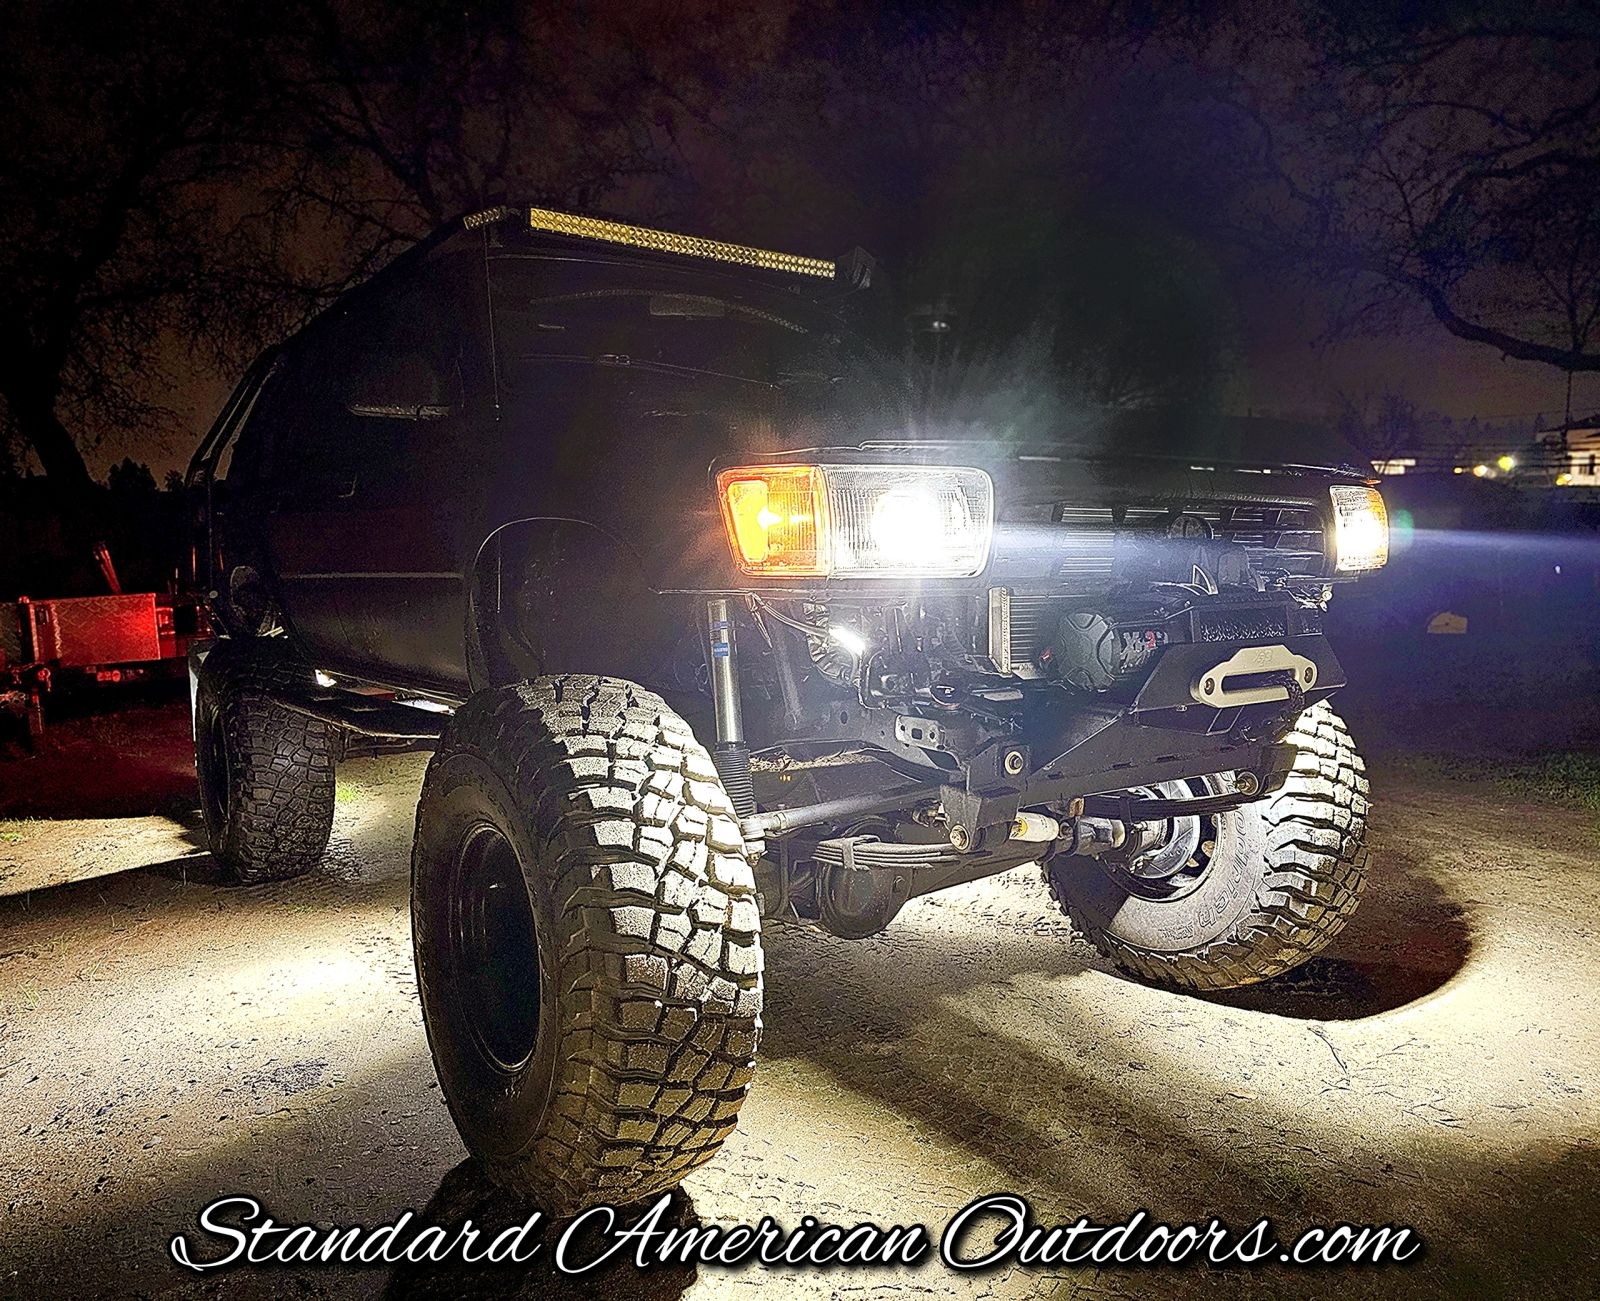
Standard American 1990-1995 4runner LED headlight upgrade. outdoors - Toyota 4runner, Offroad, Lifestyle Blog.
Meta Description: The ultimate guide to upgrading your 1990-1995 Toyota 4Runner headlights. Compare LED, halogen, and sealed beam options. Find DOT-approved solutions for superior visibility and safety. Learn how to choose and install the best headlight for your 2nd gen 4Runner.
The Ultimate Guide to 2nd Generation Toyota 4Runner Headlights: LED Upgrades, Problems, and Solutions
The 2nd generation Toyota 4Runner, a vehicle celebrated for its rugged durability and timeless design, has a significant flaw that every owner knows intimately: its disappointingly dim factory headlights. This guide provides a comprehensive solution, delving into the problems of outdated sealed beam and halogen technologies and illuminating the path forward with modern LED projector headlights. Prepare to transform your 4Runner’s visibility, safety, and style.
Chapter 1: The Achilles' Heel of a Legend: A Deep Dive into the Failures of Stock 2nd Gen 4Runner Headlights
To truly appreciate the revolutionary leap in performance that modern LED headlights offer, it is essential to first understand the severe limitations of the factory-installed lighting on the 2nd generation Toyota 4Runner. Toyota, for all its engineering prowess in creating a nearly indestructible vehicle, equipped these trucks with headlight technology that was already becoming obsolete by the 1990s. This has left a legacy of poor visibility and significant safety concerns for owners. The lighting issues are not just a matter of preference; they are a fundamental flaw that compromises the vehicle's usability in low-light conditions. The problem is so pervasive that it has become a universal pain point within the enthusiast community, with countless forum threads and social media posts dedicated to finding a solution for the dim 4runner headlights.
#### The Tale of Two Systems: Sealed Beams and Composite Halogens
The 2nd generation 4Runner's production run from 1990 to 1995 spanned a transitional period in automotive lighting technology. As a result, there are two distinct factory headlight systems that owners will encounter, each with its own set of significant drawbacks.
The 1990-1991 Models: Trapped in the Past with Sealed Beam Headlights
For the initial two years of its production, the 2nd gen 4Runner was fitted with 7x6 inch rectangular sealed beam headlights. This technology, which dates back to the 1940s, is a relic of a bygone era. A sealed beam unit is exactly what its name implies: the filament, reflector, and lens are all integrated into a single, non-serviceable glass housing. When the filament burns out, the entire headlight unit must be replaced. This design presents a multitude of problems for the modern driver.
- Pathetic Light Output: By today's standards, the light output from a stock sealed beam is alarmingly low. They produce a dim, yellowish light that struggles to illuminate the road ahead, making it difficult to spot hazards, read signs, or navigate unlit roads with any degree of confidence. This is the root cause of the widespread 4runner poor visibility at night.
- No Upgrade Path: The sealed design means you cannot simply swap out the bulb for a brighter, more modern alternative. Your only option is to replace the entire unit with another sealed beam of the same outdated technology, perpetuating the cycle of poor performance.
- Poor Beam Control: The simple reflector design does a poor job of controlling the light beam. This results in a significant amount of glare for oncoming drivers and a scattered, unfocused light pattern that fails to concentrate illumination where it is needed most: on the road ahead.
- Increased Cost Over Time: While a single sealed beam unit might seem inexpensive, the need to replace the entire unit every time a filament burns out can lead to higher long-term costs compared to modern systems with replaceable bulbs.
For owners of 1990-1991 models, the only way to truly escape these limitations is through a complete toyota 4runner sealed beam conversion, a process that involves replacing the entire headlight assembly with a modern housing that can accept a separate, high-performance bulb. This is one of the most common and necessary 2nd gen 4runner mods for early models.
The 1992-1995 Models: A Step Forward, But Still in the Dark with Composite Halogens
Standard american outdoors - Toyota 4runner, Offroad, Lifestyle Blog
Recognizing the limitations of sealed beam technology, Toyota updated the 4Runner's front end for the 1992 model year, introducing a more modern composite headlight assembly with a replaceable halogen bulb. These housings, which are specific to the Toyota 4Runner 1992-1995 headlights, were a welcome improvement, but they are still woefully inadequate by modern safety and performance standards.
The shortcomings of the 92-95 composite halogen headlights include:
- Insufficient Brightness: While brighter than their sealed beam predecessors, the stock halogen bulbs (typically 9004-type) still produce a relatively low lumen output. The light is often described as a dull, warm yellow that lacks the intensity and clarity of modern LED or even HID systems.
- Inefficient Reflector Design: The factory reflector housings were designed specifically for the light-emitting characteristics of a halogen bulb. When owners attempt a simple 4runner halogen to LED conversion by dropping an LED bulb into the stock housing, the result is often a dangerously uncontrolled beam pattern that creates massive glare for other drivers and fails to project light effectively down the road.
- High Heat and Energy Consumption: Halogen bulbs generate a significant amount of heat, which can lead to premature bulb failure and degradation of the headlight housing over time. They are also far less energy-efficient than modern LEDs, placing a greater strain on the vehicle's electrical system.
- Short Lifespan: The average halogen bulb has a lifespan of around 1,000 hours, meaning they will need to be replaced far more frequently than their LED counterparts, which can last for 30,000 hours or more.
While the composite halogen system was an improvement over the sealed beams, it still represents a significant compromise in safety and performance. The only way to truly unlock the full lighting potential of the 2nd gen 4Runner is to move beyond these outdated technologies and embrace the power of modern LED projector headlights.
Chapter 2: The Dawn of a New Era: The Unmistakable Advantages of LED Projector Headlights
For years, the 2nd gen 4Runner community has been searching for a true solution to the vehicle's lighting woes. Simple drop-in LED bulbs in the factory housings have proven to be a dangerous and ineffective compromise, while custom retrofits are often complex, expensive, and time-consuming. The arrival of purpose-built LED projector headlights for the 2nd gen 4Runner marks a turning point for owners, offering a complete, DOT-compliant solution that addresses all the shortcomings of the stock systems. These are not just incremental improvements; they are a revolutionary leap forward in safety, performance, and style.
#### What is a Projector Headlight, and Why Does it Matter?
Unlike traditional reflector headlights that simply bounce light off a chrome-plated surface, projector headlights use a lens to focus and direct the light beam. This technology, which was once reserved for luxury vehicles, is now available as a direct-fit upgrade for the 2nd gen 4Runner. The key components of a projector headlight include:
- LED Light Source: A powerful and efficient LED chip that generates the light.
- Reflector: A small, precisely shaped reflector that captures the light from the LED and directs it towards the lens.
- Cutoff Shield: A small metal plate that creates the sharp, clean cutoff line that defines the top of the low beam pattern. This is the single most important component for preventing glare to oncoming drivers.
- Lens: A convex lens that magnifies, focuses, and projects the light onto the road in a precisely controlled pattern.
This combination of components results in a level of performance and control that is simply unattainable with a traditional reflector housing. The benefits are not just noticeable; they are game-changing.
#### The Top 5 Benefits of Upgrading to LED Projector Headlights
1. Massively Improved Visibility and Safety: This is the most critical benefit. A high-quality LED projector headlight can produce a beam pattern that is up to 300% brighter than the stock halogens, with a much wider and longer throw. This allows you to see further down the road and identify potential hazards much earlier, giving you more time to react. The clean cutoff also ensures that you are not blinding other drivers, making night driving safer for everyone.
2. DOT Compliance and Legality: Unlike drop-in LED bulbs in halogen housings, which are not DOT-compliant and can get you a ticket, purpose-built LED projector headlights like the Sinister, Everest, and Atom models from Standard American Outdoors are designed to meet or exceed all DOT standards. This means you can enjoy the benefits of modern lighting without worrying about legal issues.
3. Plug-and-Play Installation: Gone are the days of complex wiring and custom fabrication. These headlights are designed as a direct replacement for the factory units, with a simple plug-and-play installation that can be completed in your own driveway with basic hand tools. This makes the upgrade accessible to all owners, regardless of their mechanical skill level.
4. Exceptional Durability and Longevity: The LED modules in these headlights have a lifespan of up to 30,000 hours. That means you could drive for three and a half years continuously before they would need to be replaced. They are also built to withstand the rigors of off-road use, with durable housings and lenses that can take a beating.
5. Modern, Aggressive Styling: Let's be honest: the stock headlights look dated. A set of modern LED projector headlights with features like daytime running light (DRL) halos can dramatically update the look of your 2nd gen 4Runner, giving it a more aggressive and stylish appearance that will turn heads on and off the trail.
#### LED vs. Halogen vs. Sealed Beam: A Head-to-Head Comparison
| Feature | LED Projector Headlights | Halogen Composite Headlights (1992-1995) | Sealed Beam Headlights (1990-1991) |
| ---------------- | ------------------------------------------------------ | ------------------------------------------------------ | -------------------------------------------------- |
| Brightness | Up to 300% brighter than halogen | Moderate | Very dim |
| Beam Control | Excellent, with a sharp cutoff | Poor, especially with LED drop-in bulbs | Very poor, with significant glare |
| Lifespan | 30,000+ hours | ~1,000 hours | ~500 hours |
| Energy Use | Very low | Moderate | High |
| DOT Compliant| Yes (with proper design) | Yes (with stock bulbs) | Yes |
| Cost | Higher initial investment, but better long-term value | Lower initial cost, but frequent replacements | Low initial cost, but frequent replacements |
| Styling | Modern and aggressive | Dated | Very dated |
As the table clearly shows, LED projector headlights are the undisputed champion in every category. They offer a quantum leap in performance, safety, and style, making them the single most effective upgrade you can make to your 2nd generation Toyota 4Runner.
Chapter 3: Choosing Your Weapon: A Guide to the Standard American Outdoors LED Projector Headlight Lineup
Standard american outdoors - Toyota 4runner, Offroad, Lifestyle Blog
Now that you understand the undeniable superiority of LED projector headlights, it's time to choose the right set for your 2nd gen 4Runner. At Standard American Outdoors, we've developed a range of models to suit every owner's needs and style preferences. All of our headlights are built on a foundation of quality, performance, and durability, and all are DOT-compliant, so you can be confident that you're making a safe and legal upgrade. Let's take a closer look at the Sinister, Everest, Atom, and Apollo models.
#### The "Sinister": Our Bestselling, All-Around Performer
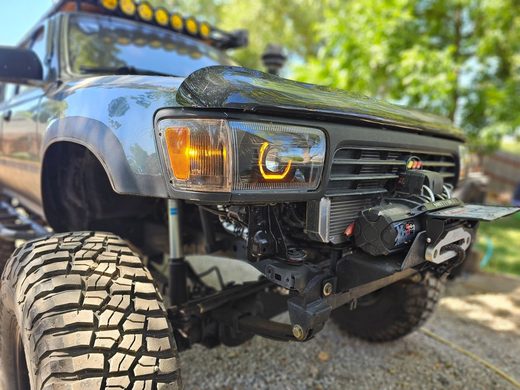
The Sinister is our most popular model, and for good reason. It offers the perfect balance of aggressive styling, exceptional performance, and easy installation. The high-gloss black housing and amber "demon eye" daytime running light (DRL) give your 4Runner a modern, menacing look that will set it apart from the crowd. But the Sinister is not just about looks; it's a true performance powerhouse.
- Best for: The owner who wants a proven, all-around performer with aggressive styling.
- Key Features: High-gloss black housing, amber DRL, 99% plug-and-play installation.
- Price: $499.99
#### The "Everest": Classic Styling, Uncompromising Performance
For the owner who prefers a more classic, OEM+ look, the Everest is the perfect choice. It features a clean, chrome housing that blends seamlessly with the stock 4Runner aesthetic, while still delivering the same incredible light output and beam control as the Sinister. The Everest is the ideal choice for the discerning owner who wants to maintain a factory appearance while enjoying the benefits of modern lighting technology.
- Best for: The owner who wants a classic, OEM+ look with modern performance.
- Key Features: Chrome housing, clean and classic styling, exceptional light output.
- Price: $499.00
#### The "ATOM": The Ultimate in Compact Power
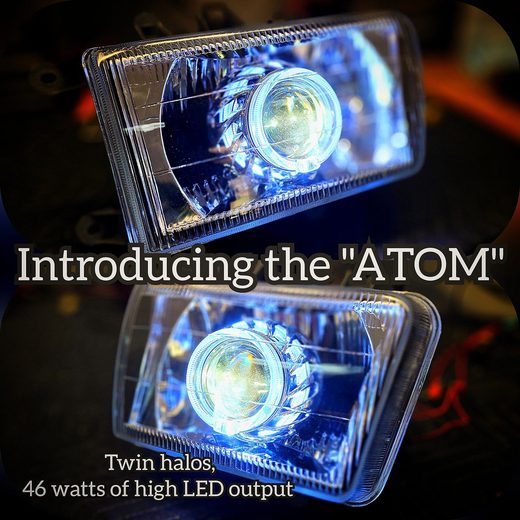
The ATOM is our most compact and powerful headlight, featuring twin blue LED projectors that produce an incredible 56 watts of high-intensity light. The ATOM is the perfect choice for the owner who wants the absolute brightest and most powerful headlights on the market. The unique twin-projector design gives your 4Runner a futuristic look that is sure to turn heads.
- Best for: The owner who demands the absolute maximum light output and a unique, high-tech look.
- Key Features: Twin white LED projectors, 56 watts of power, ultra-high intensity.
- Price: $499.00
#### The "Apollo": A Modern Classic
The Apollo is our newest model, combining the classic look of a round projector with the modern performance of our other headlights. The Apollo is a great choice for owners who want a unique look that is both modern and timeless.
- Best for: The owner who wants a unique, modern-classic look.
- Key Features: Round projector design, modern performance, timeless styling.
- Price: (Check website for latest pricing)
#### DEPO Style Headlights: A Budget-Friendly Option
For owners on a tighter budget, we also offer DEPO style headlights. These are a great option for replacing old, hazy, or damaged factory housings. While they don't offer the same level of performance as our projector headlights, they are a significant improvement over the stock sealed beams and are a great starting point for any 2nd gen 4Runner owner looking to improve their visibility.
- Best for: The owner on a budget who needs to replace old or damaged housings.
- Key Features: Affordable, direct replacement for factory housings.
- Price: $289.00
No matter which model you choose, you can be confident that you're getting a high-quality, DOT-compliant headlight that will transform your driving experience. In the next chapter, we'll walk you through the simple process of installing your new headlights.
Chapter 4: From Box to Trail: A Step-by-Step Guide to Installing Your New 2nd Gen 4Runner LED Projector Headlights
One of the most significant advantages of the Standard American Outdoors headlight lineup is the ease of installation. We've designed our headlights to be a true plug-and-play solution, allowing you to complete the upgrade in your own garage with basic hand tools. This chapter will provide a detailed, step-by-step guide to replacing your old, tired factory headlights with a new set of high-performance LED projectors. This 4runner headlight installation guide is applicable to all 1990-1995 models, with minor differences between the sealed beam and composite housing designs.
#### Tools and Materials Needed
Before you begin, gather the following tools and materials:
- Ratchet and socket set (10mm, 12mm)
- Phillips head screwdriver
- Flathead screwdriver
- Pliers
- Wire strippers/crimpers (for DRL connection)
- T-taps or other wire connectors
- Your new Standard American Outdoors LED projector headlights
#### Step 1: Remove the Grille
The first step is to remove the front grille to gain access to the headlight assemblies. The grille is held in place by a series of clips and screws.
1. Remove the corner lights: The corner lights are typically held in by a single Phillips head screw. Remove the screw and gently pull the corner light forward to release it from the clips.
2. Remove the grille mounting bolts: There are several 10mm bolts along the top of the grille. Remove these bolts.
3. Release the clips: There are several clips along the bottom of the grille. Use a flathead screwdriver to gently pry these clips loose.
4. Remove the grille: Once all the bolts and clips are released, you can gently pull the grille away from the vehicle.
#### Step 2: Remove the Old Headlight Assembly
With the grille removed, you now have access to the headlight assemblies. The process for removing the headlights differs slightly between the 1990-1991 sealed beam models and the 1992-1995 composite models.
For 1990-1991 Sealed Beam Models:
1. Remove the retaining ring: The sealed beam unit is held in place by a metal retaining ring, which is secured by four Phillips head screws. Remove these screws and the retaining ring.
2. Disconnect the wiring harness: The sealed beam unit can now be pulled forward. Disconnect the wiring harness from the back of the unit.
For 1992-1995 Composite Models:
1. Remove the mounting bolts: The composite headlight assembly is held in place by four 12mm bolts. Remove these bolts.
2. Disconnect the wiring harness: Pull the headlight assembly forward and disconnect the wiring harness from the back of the bulb.
#### Step 3: Install the New LED Projector Headlight
Now it's time to install your new headlights. This process is essentially the reverse of the removal process.
1. Connect the main wiring harness: The main headlight plug on your new LED projector headlight is designed to be a direct plug-in replacement for the factory harness. Connect the new headlight to the factory wiring.
2. Connect the DRL wire (optional): If you wish to use the daytime running light (DRL) feature, you will need to connect the DRL wire to a power source. We recommend tapping into the corner light wiring using a T-tap or other wire connector. This will activate the DRL whenever your corner lights are on.
3. Mount the new headlight assembly: Secure the new headlight assembly in place using the factory mounting bolts. For sealed beam models, you will reuse the retaining ring.
4. Test the headlights: Before you reinstall the grille, it's a good idea to test the headlights to ensure that everything is working correctly. Test the low beams, high beams, and DRLs.
#### Step 4: Reinstall the Grille and Aim the Headlights
Once you've confirmed that the new headlights are working properly, you can reinstall the grille and corner lights. The final and most important step is to properly aim your new headlights.
1. Find a level surface: Park your 4Runner on a level surface, about 25 feet away from a wall or garage door.
2. Measure the headlight height: Measure the distance from the ground to the center of your headlight projectors.
3. Mark the wall: On the wall, mark a horizontal line at the same height as your headlights. Then, mark a vertical line directly in front of each headlight.
4. Aim the low beams: Turn on your low beams. The top of the cutoff line should be about 2 inches below the horizontal line you marked on the wall. Use the adjustment screws on the back of the headlight assembly to raise or lower the beam pattern as needed.
5. Aim the high beams: The high beams are typically aligned with the low beams, so they should be properly aimed if the low beams are correct.
Proper aiming is crucial for maximizing the performance of your new headlights and preventing glare to other drivers. Take your time with this step and get it right. If you're not comfortable aiming the headlights yourself, any automotive shop can do it for you.
Congratulations! You've successfully installed your new 2nd gen 4Runner LED projector headlights. It's time to hit the road and experience the night in a whole new light.
Chapter 5: Illuminating the Law: DOT Compliance, Legality, and Why It Matters for Your 4Runner
When upgrading your 2nd gen 4Runner’s headlights, performance and style are important, but they should never come at the expense of safety and legality. The world of aftermarket lighting is filled with products that make impressive claims but fail to meet the strict standards set by the Department of Transportation (DOT). Installing non-compliant headlights not only puts you and other drivers at risk but can also lead to hefty fines and failed inspections. This chapter will demystify the topic of DOT approved 4runner headlights, explaining what compliance means and why it is a non-negotiable factor when choosing an upgrade.
#### What is DOT Compliance?
The DOT, through the National Highway Traffic Safety Administration (NHTSA), establishes the Federal Motor Vehicle Safety Standards (FMVSS). FMVSS 108 is the specific standard that governs all automotive lighting equipment in the United States. This standard dictates everything from brightness (photometrics) and beam pattern to durability and material quality. A headlight that is “DOT compliant” has been designed and tested to meet or exceed these minimum standards.
It is crucial to understand that simply stamping “DOT” on a product does not make it compliant. Many overseas manufacturers illegally mark their products without any testing or validation. True compliance requires rigorous engineering and testing to ensure the headlight performs as intended and is safe for road use.
#### The Dangers of Non-Compliant Headlights
The most common and dangerous example of non-compliant lighting is the use of drop-in LED bulbs in halogen reflector housings. While these bulbs may produce a lot of light, the factory halogen housing is not designed to control the output of an LED. This results in a number of serious problems:
- Extreme Glare: The uncontrolled light scatters in all directions, creating blinding glare for oncoming drivers. This is not just an annoyance; it is a major safety hazard that can cause accidents.
- Poor Beam Pattern: Instead of a focused beam of light directed down the road, you get a messy, splotchy pattern with dark spots and “hot spots.” This actually reduces your effective visibility, even if the bulbs themselves are technically brighter.
- False Sense of Security: Drivers often feel like they can see better because of the sheer amount of foreground light, but the lack of down-the-road projection means they are actually out-driving their headlights at highway speeds.
This is why a complete, purpose-built LED projector headlight assembly is the only safe and legal way to upgrade your 4Runner to LED technology. The projector optics are specifically designed to control the light from the LED source, creating a sharp cutoff and a focused beam pattern that illuminates the road without blinding other drivers.
#### How Standard American Outdoors Ensures Compliance
At Standard American Outdoors, we take safety and legality seriously. All of our headlight models—the Sinister, Everest, Atom, and Apollo—are designed and manufactured to be fully DOT compliant. We achieve this through:
- Proper Optics: We use high-quality projector lenses and cutoff shields to create a precise, controlled beam pattern that meets FMVSS 108 standards.
- Durable Materials: Our headlights are built with high-quality, impact-resistant polycarbonate lenses and durable housings that can withstand the elements and the rigors of off-road use.
- Rigorous Testing: We subject our headlights to extensive testing to ensure they meet or exceed all DOT requirements for brightness, beam pattern, and durability.
When you purchase a set of headlights from Standard American Outdoors, you can be confident that you are getting a product that is not only a massive performance upgrade but also a safe and legal one. Don’t compromise on safety. Choose a DOT-compliant solution and light up the night with confidence.
Chapter 6: When the Lights Go Out: Troubleshooting Common 2nd Gen 4Runner Headlight Issues
Even with a high-quality headlight upgrade, electrical gremlins can sometimes appear in a vehicle that is over 30 years old. Understanding how to diagnose common headlight problems can save you time, money, and frustration. This chapter will serve as your guide to troubleshooting the most frequent 4runner headlight problems, from a single dead bulb to flickering and beam selection issues.
#### Problem 1: One Headlight is Out
This is the most common headlight issue. If one of your new LED projector headlights is not working, follow these steps to diagnose the problem:
1. Check the Connection: The first and most likely culprit is a loose connection. Unplug the main wiring harness from the back of the non-working headlight and plug it back in, ensuring it is seated firmly.
2. Swap Components: If the connection is secure, the next step is to determine if the issue is with the headlight itself or the vehicle's wiring. Unplug both headlights and swap them. Plug the working headlight into the non-working side and vice-versa.
- If the original non-working headlight now works on the other side, the problem is with your vehicle's wiring or fuse on the non-working side.
- If the headlight still doesn't work on the good side, the issue is with the headlight unit itself. Contact customer support for a warranty claim.
3. Check the Fuses: Your 4Runner has separate fuses for the left and right headlights. Check the fuse box (typically located in the driver's side kick panel or the engine bay) for a blown fuse. Replace it with a fuse of the same amperage if necessary. If the fuse blows again immediately, you have a short circuit that needs to be investigated.
#### Problem 2: Headlights are Flickering
Flickering headlights can be caused by a few different issues, often related to an unstable power supply.
1. Check the Ground Connection: A poor ground is the most common cause of flickering. Ensure that the ground wire for the headlight harness is securely attached to a clean, unpainted metal surface on the vehicle's chassis.
2. Inspect the Wiring: Look for any loose, frayed, or corroded wires in the headlight circuit. The factory wiring can become brittle over three decades of use.
3. Check the Alternator: A failing alternator can cause the voltage in your electrical system to fluctuate, leading to flickering lights. With the engine running, use a multimeter to check the voltage at the battery. A healthy alternator should produce between 13.8 and 14.5 volts.
#### Problem 3: High Beams or Low Beams Don't Work
If you can't switch between high and low beams, the problem is almost always in the control side of the circuit, not the headlights themselves.
1. Check the Dimmer Switch: The most likely culprit is a faulty dimmer switch, which is part of the combination switch on your steering column. These switches are known to wear out over time. You may notice that the high beams flash when you pull the stalk, but they won't stay on.
2. Inspect the Headlight Relay: The headlight circuit uses a relay to handle the high current draw. A faulty relay can prevent the high or low beams from activating. You can test the relay by swapping it with a known good relay of the same type from the fuse box.
3. Examine the Wiring: As always, check for any damage to the wiring between the combination switch, the relay, and the headlights.
#### Problem 4: My New LED Headlights Are Still Dim
If you've installed your new LED projector headlights and the output still seems dim, the issue is likely a voltage drop in your factory wiring. The original wiring is thin and can degrade over time, leading to a loss of power before it reaches the headlights. The best solution for this is to install a 4runner headlight wiring harness upgrade.
An upgraded wiring harness pulls power directly from the battery and uses the factory headlight switch only as a trigger for a set of relays. This ensures that the headlights receive a full 12 volts, maximizing their brightness and performance. This is a highly recommended upgrade for any 2nd gen 4Runner, as it will dramatically improve the performance of any headlight system, stock or aftermarket.
By following these troubleshooting steps, you can diagnose and resolve the most common headlight issues on your 2nd gen 4Runner. If you're still having trouble, don't hesitate to reach out to our customer support team or consult a qualified automotive technician.
Chapter 7: The Investment in Vision: A Cost Analysis of 2nd Gen 4Runner Headlight Upgrades
When planning any modification for your 2nd gen 4Runner, the budget is always a key consideration. While it may be tempting to opt for the cheapest option available, a thorough cost analysis reveals that a high-quality LED projector headlight upgrade is not just an expense, but a wise long-term investment in safety, reliability, and enjoyment. This chapter will break down the true cost of various 4runner headlight upgrade cost scenarios, from sticking with outdated technology to making the definitive leap to modern LED projectors.
#### The Hidden Costs of Sticking with Stock
At first glance, simply replacing burnt-out factory bulbs seems like the most affordable path. However, this approach ignores the hidden costs associated with underperforming and outdated technology.
Scenario 1: The Sealed Beam Cycle (1990-1991 Models)
- Initial Cost: A single sealed beam unit can cost anywhere from $15 to $30.
- Lifespan: Approximately 500-1000 hours.
- Long-Term Cost: Assuming you drive an average of 1 hour per night, you could be replacing your headlights every 1-2 years. Over a decade of ownership, this could add up to $150-$600 in replacement units alone, not to mention the hassle of frequent replacement.
- The Intangible Cost: The most significant cost is the one that doesn't appear on a receipt: the cost of poor visibility. The constant eye strain, the near-misses with unseen road hazards, and the lack of confidence during night driving all take a toll on your safety and driving enjoyment.
Scenario 2: The Halogen Treadmill (1992-1995 Models)
- Initial Cost: A pair of replacement 9004 halogen bulbs costs around $20-$40.
- Lifespan: Approximately 1,000 hours.
- Long-Term Cost: Over a decade, you can expect to spend $100-$200 on replacement bulbs. While cheaper than sealed beams, you are still locked into a cycle of mediocre performance and frequent maintenance.
- The Failed Upgrade Cost: Many owners attempt a cheap "upgrade" with drop-in LED bulbs ($50-$100). They quickly discover the dangerous glare and poor beam pattern, and often end up reverting to halogens or seeking a proper projector solution. This wasted money should be factored into the total cost of ownership.
#### The Value Proposition of an LED Projector Upgrade
A complete LED projector headlight assembly from Standard American Outdoors represents a higher initial investment, but the long-term value proposition is undeniable.
| Upgrade Option | Initial Cost (Approx.) | Lifespan (Hours) | 10-Year Bulb Cost | Key Benefit |
| ---------------------------------- | ---------------------- | ---------------- | ----------------- | ---------------------------------------------- |
| Sealed Beam Replacement | $30 - $60 | 500 - 1,000 | $150 - $600 | Maintains stock appearance (and poor performance) |
| Halogen Bulb Replacement | $20 - $40 | 1,000 | $100 - $200 | Inexpensive and readily available |
| Drop-in LED Bulbs (Not Rec.) | $50 - $100 | 10,000+ | $50 - $100 | Brighter, but dangerous glare and poor pattern |
| SAO DEPO Style Housings | $289 | N/A (Housing) | Varies by bulb | Affordable housing replacement for damaged units |
| SAO LED Projector Headlights | $499 | 30,000+ | $0 | Superior performance, safety, and longevity |
As the table illustrates, the 4runner headlight upgrade cost is not just about the upfront price. When you factor in the lifespan of the components, the LED projector upgrade becomes the most cost-effective solution over the life of your vehicle.
- Zero Maintenance: With a 30,000+ hour lifespan, you can realistically expect your LED projector headlights to last for the entire time you own your 4Runner. No more changing bulbs on a cold night.
- Increased Resale Value: A high-quality, DOT-compliant headlight upgrade is a desirable feature that can increase the resale value of your vehicle. It shows potential buyers that the vehicle has been well-maintained and thoughtfully modified.
- Safety and Peace of Mind: You cannot put a price on safety. The dramatic improvement in visibility and the reduction in driver fatigue during night driving are invaluable benefits that pay dividends every time you get behind the wheel after dark.
When viewed as a long-term investment in safety, performance, and reliability, a set of Standard American Outdoors LED projector headlights is one of the most logical and valuable upgrades you can make to your 2nd generation Toyota 4Runner.
Chapter 8: Preserving the Light: Maintenance and Care for Your LED Headlights
Your new LED projector headlights are designed for exceptional durability and longevity, requiring far less attention than their halogen or sealed beam predecessors. However, a few simple maintenance practices can ensure they continue to perform at their peak for years to come. This chapter provides essential maintenance tips for LED headlights to keep them shining bright and clear.
#### 1. Keep Them Clean
This may seem obvious, but it's the most important aspect of headlight maintenance. A dirty, hazy, or pitted lens can reduce light output by as much as 50%, negating the benefits of your powerful LEDs.
- Regular Washing: Wash your headlight lenses with automotive soap and a soft microfiber towel every time you wash your vehicle. Avoid using abrasive brushes or harsh chemicals that could scratch the polycarbonate lens material.
- Bug and Tar Removal: Promptly remove bug splatter and road tar using a dedicated bug and tar remover. These substances can be acidic and may etch the lens surface if left for extended periods.
#### 2. Protect the Lens
The polycarbonate lenses on modern headlights are durable, but they are not impervious to damage from UV rays and road debris.
- Apply a Sealant or Wax: Periodically apply a high-quality UV-protectant sealant or wax to the lenses. This acts like sunscreen for your headlights, preventing the polycarbonate from oxidizing and turning yellow or hazy over time. This is especially important if your 4Runner spends a lot of time parked outside.
- Consider Paint Protection Film (PPF): For the ultimate in protection, consider having a professional installer apply clear paint protection film over your headlight lenses. This durable film provides a sacrificial barrier against rock chips, sandblasting, and UV damage, keeping your lenses in pristine condition.
#### 3. Check Your Aim Periodically
While your headlights should hold their aim well, it's a good practice to check it periodically, especially if you frequently drive on rough roads or have made changes to your vehicle's suspension.
- Annual Check-Up: Once a year, park on a level surface in front of a wall and check that your low beam cutoff is still sharp, level, and aimed correctly (as described in Chapter 4).
- Post-Suspension Work: Always re-aim your headlights after installing a lift kit, new springs, or making any other changes that affect your vehicle's ride height. A change of even an inch can significantly alter your beam pattern.
#### 4. Inspect Wiring and Connections
While our plug-and-play harnesses are designed for reliability, it's wise to perform a quick visual inspection of the wiring once a year.
- Check for Corrosion: Look for any signs of corrosion on the connectors, especially if you live in a wet climate or an area that uses road salt in the winter. Dielectric grease can be applied to the connectors to prevent moisture intrusion.
- Ensure Secure Connections: Make sure all plugs are firmly seated and that any T-taps or other connectors for your DRLs are secure.
By following these simple maintenance steps, you can ensure that your Standard American Outdoors LED projector headlights continue to provide a safe and exceptional lighting experience for the life of your 2nd gen 4Runner. A little preventative care goes a long way in preserving your investment in vision.
Chapter 9: The Road Ahead: Embracing the Future of 4Runner Lighting
The 2nd generation Toyota 4Runner is a timeless classic, a vehicle whose legacy is written in the dirt and asphalt of countless adventures. For too long, however, its full potential has been held back by the dim, yellow glow of outdated headlight technology. It is a flaw that has been accepted as a quirky characteristic, but it is a compromise that no owner should have to make. The era of squinting into the darkness is over.
The advent of high-quality, DOT-compliant LED projector headlights from Standard American Outdoors represents more than just an upgrade; it is a fundamental transformation of the 2nd gen 4Runner driving experience. It is the fusion of modern technology with classic design, a solution that respects the vehicle's heritage while bringing its performance squarely into the 21st century.
This guide has walked you through every aspect of this crucial upgrade. We have dissected the failures of the stock sealed beam and halogen systems, illuminated the undeniable benefits of LED projector technology, and provided a clear, step-by-step path to installation. We have explored the critical importance of DOT compliance and demystified the true cost of ownership, proving that an investment in quality lighting is an investment in safety, reliability, and peace of mind.
Choosing to upgrade your headlights is choosing to unlock the full potential of your legendary 4Runner. It is about turning night into day on a remote trail, navigating a rain-slicked highway with newfound confidence, and rediscovering the joy of driving a vehicle that is as capable as it is iconic. It is about honoring the past while embracing the future.
The road ahead is waiting. It is time to light it up. Standard American Outdoors is proud to be your partner in this journey, providing the best-in-class products and expert support that the 2nd gen 4Runner community deserves. Welcome to the bright side.
Chapter 10: Frequently Asked Questions: Your 2nd Gen 4Runner Headlight Queries Answered
We get a lot of questions about upgrading the headlights on the 1990-1995 Toyota 4Runner. To help you make the most informed decision, we’ve compiled a list of the most frequently asked questions. This chapter serves as a quick-reference guide to address your most pressing concerns about the best LED headlights for 2nd gen 4runner.
#### Q1: Are LED headlights really better than HID headlights?
This is a common point of debate. While HID (High-Intensity Discharge) systems can produce a very bright light, they have several disadvantages compared to modern LED projectors. HIDs require a ballast to operate, which is an additional failure point. They also have a warm-up time, meaning they are not at full brightness the instant you turn them on. Furthermore, the lifespan of an HID bulb is significantly shorter than an LED (around 2,000-3,000 hours vs. 30,000+ hours). For a vehicle like the 4Runner, which values reliability and simplicity, the instant-on, long-lasting, and durable nature of a self-contained LED projector is the superior choice.
#### Q2: Can I just put an LED bulb in my stock 1994 4Runner headlight housing?
No, you should not. As we detailed in Chapter 5, this is a dangerous and illegal modification. The factory halogen reflector housing is not designed to control the light from an LED bulb. This creates a scattered, uncontrolled beam that causes dangerous glare for other drivers and does not effectively illuminate the road. The only safe and effective way to upgrade to LED is to use a complete, purpose-built projector headlight assembly that is DOT-compliant.
#### Q3: What is a "cutoff line" and why is it so important?
The cutoff line is the sharp, horizontal line that defines the top of the low beam pattern. In a properly designed projector headlight, the cutoff is very distinct, with bright light below the line and very little light above it. This is what allows you to have a powerful low beam that illuminates the road far ahead without shining into the eyes of oncoming drivers. A poor cutoff, or no cutoff at all (as is the case with LED bulbs in halogen housings), is the primary cause of dangerous glare.
#### Q4: Will these headlights fit my 1991 4Runner with sealed beam headlights?
Yes! Our LED projector headlights are designed to be a direct replacement for both the early sealed beam housings (1990-1991) and the later composite housings (1992-1995). The installation process is slightly different, as outlined in Chapter 4, but the end result is a seamless, plug-and-play upgrade for all 2nd gen 4Runners.
#### Q5: Is the wiring complicated? Do I need a special harness?
The installation is designed to be as simple as possible. The main headlight function is 99% plug-and-play, connecting directly to your factory harness. The only separate wiring required is for the optional Daytime Running Light (DRL) feature, which involves connecting a single wire to your corner light or another power source. While not required for our headlights to function, we do highly recommend a 4runner headlight wiring harness upgrade for all 2nd gen 4Runners. This upgraded harness pulls power directly from the battery, bypassing the old, thin factory wiring and ensuring your new headlights receive full voltage for maximum performance.
#### Q6: What does "DOT Approved" actually mean?
"DOT Approved" means that the headlight has been designed and tested to meet the specific safety and performance standards outlined in the Department of Transportation's Federal Motor Vehicle Safety Standard 108 (FMVSS 108). This is your assurance that the headlight is legal for road use and will perform safely and effectively. Be wary of cheap headlights that claim to be DOT approved without any proof or reputable branding.
#### Q7: How do I know if my current headlights are sealed beams or composites?
It’s easy to tell. If you have a 1990 or 1991 4Runner, you have sealed beam headlights. The entire front of the light is a glass lens, and there is no separate, removable bulb. If you have a 1992, 1993, 1994, or 1995 4Runner, you have composite headlights with a plastic lens and a replaceable halogen bulb accessible from the back of the housing.
#### Q8: My current headlights are yellow and hazy. Will this happen to my new LED headlights?
That yellowing and hazing is UV damage to the polycarbonate lens. Our headlights are made with high-quality, UV-resistant polycarbonate and a protective coating to prevent this from happening. With the simple maintenance steps outlined in Chapter 8, such as regular cleaning and applying a sealant, your new headlight lenses will stay crystal clear for many years.
#### Q9: What is a "core charge"?
For some of our headlight models, particularly those using retrofitted OEM housings, we include a refundable core charge. This means you pay a deposit, and when you send us your old, rebuildable headlight housings back using the provided label, we refund the deposit to you. This helps us keep costs down and recycle usable OEM parts, which is a win-win for everyone.
#### Q10: Are these headlights difficult to aim?
No, they are not. Our headlights feature easily accessible adjustment screws on the back of the housing, just like the factory units. The process for aiming them is the same as for any other vehicle and is detailed in Chapter 4. Proper aiming is the final, crucial step to unlocking the full performance of your upgrade, so it’s important to do it correctly.
Chapter 11: Real-World Performance: What to Expect On and Off the Road
Technical specifications and feature lists are important, but what truly matters is how your new headlights perform in the real world. Upgrading to a set of Standard American Outdoors LED projector headlights will fundamentally change your relationship with your 2nd gen 4Runner after the sun goes down. This chapter explores the tangible, real-world benefits you will experience in various driving conditions, backed by testimonials from fellow enthusiasts who have already seen the light.
#### On the Highway: Conquering the Darkness
The stock headlights on a 2nd gen 4Runner make highway driving at night an exercise in anxiety. The dim, narrow beam forces you to strain your eyes, and the lack of down-the-road projection means you are often out-driving your lights, giving you precious little time to react to debris or animals on the road.
After the Upgrade:
With a set of our LED projectors, the difference is staggering. The bright, white light illuminates the road for hundreds of feet ahead, clearly defining the lane markings and road signs that were previously lost in the gloom. The wide, even beam pattern covers the entire width of the road, including the shoulders, making it easy to spot deer or other wildlife before they become a hazard. The sharp cutoff ensures you can use this powerful light without causing glare for oncoming traffic or drivers in front of you.
> Testimonial: "I used to dread driving my '93 on the freeway at night. It was honestly sketchy. After installing the Sinister headlights, it's like driving a modern car. The reach of the low beams is incredible, and I can finally see what's ahead of me. It's the single best safety mod I've ever done." - Mark R., 1993 4Runner SR5
#### On the Trail: Owning the Night
For the off-road enthusiast, nighttime trail runs are a unique and challenging experience. The stock headlights are simply not up to the task, providing a weak and scattered light that makes it difficult to choose the right line or spot obstacles. Many owners resort to adding multiple light bars, which can create harsh shadows and are often illegal for on-road use.
After the Upgrade:
Your new LED projector headlights become your primary off-road lighting tool. The precise beam control allows you to illuminate the trail exactly where you need it, without the distracting glare and hot spots of a cheap light bar. The intense brightness reveals ruts, rocks, and drop-offs that would be invisible with the stock lights. The durable construction means you don't have to worry about them failing you when you're miles from civilization.
> Testimonial: "I do a lot of night wheeling, and I was constantly fighting with my lighting setup. The Everest projectors changed everything. The low beams give me a perfect, wide view of the trail right in front of me, and the high beams are like a laser beam that lets me see way down the path. I barely even use my light bar anymore." - Jessica P., 1995 4Runner
#### In Adverse Weather: Cutting Through the Chaos
Driving in rain, snow, or fog is stressful enough during the day. At night, with stock headlights, it can be terrifying. The dim, yellow light of halogen bulbs reflects off of rain and snowflakes, creating a wall of glare that severely limits visibility.
After the Upgrade:
The crisp, white light of an LED projector, combined with a sharp cutoff, does a much better job of cutting through adverse weather. The light stays focused on the road surface, reducing the amount of glare that reflects back at the driver. This allows you to see the road lines and the edge of the road more clearly, providing a much safer and less fatiguing driving experience when the weather turns against you.
> Testimonial: "I live in the Pacific Northwest, so we get a lot of rain. The stock headlights were useless in a downpour. The first time I drove in the rain with the new ATOM headlights, I was blown away. I could actually see the road. The cutoff keeps the light low and out of the falling rain. It's a night and day difference." - David L., 1991 4Runner
From the daily commute to the weekend adventure, a high-quality headlight upgrade is a 24/7 improvement. It enhances safety, reduces driver fatigue, and boosts confidence in every conceivable driving scenario. It allows you to finally use your legendary 4Runner to its full potential, day or night, rain or shine.
Chapter 12: A Legacy of Adventure: A Brief History of the 2nd Generation Toyota 4Runner
To fully appreciate the passion and dedication of the 2nd generation 4Runner community, it helps to understand the vehicle's unique place in automotive history. The 1990-1995 4Runner was not just another SUV; it was the product of a legendary lineage, a vehicle that perfectly captured the spirit of adventure and reliability that defined Toyota in the 1980s and 90s. This chapter pays homage to the icon that has captured the hearts of so many.
#### From Pickup to Pathfinder: The Birth of the 4Runner
The 4Runner story begins not as an SUV, but as a creative solution to a market demand. In the early 1980s, Toyota's Hilux pickup truck (known simply as the Toyota Pickup in North America) had already established an unparalleled reputation for indestructibility. At the same time, a growing number of buyers were looking for vehicles that could blend off-road capability with more comfort and utility than a standard pickup. Competitors like the Ford Bronco and Chevy Blazer were popular, but they were large and built on full-size truck frames.
Toyota's brilliant answer was the Trekker, a collaboration with Winnebago that added a fiberglass camper shell and rear seats to the Hilux chassis. The success of the Trekker proved the concept, and in 1984, Toyota brought the idea in-house, officially launching the first-generation Toyota 4Runner. It was, in essence, a Hilux with a removable fiberglass top and a back seat. It was simple, rugged, and incredibly capable, and it laid the foundation for everything to come.
#### The Second Generation: Refining a Legend (1990-1995)
By the end of the 1980s, the SUV market was evolving. Buyers wanted more comfort, more convenience, and more refinement, without sacrificing the toughness and capability they had come to expect. Toyota responded with the launch of the second-generation 4Runner in late 1989 for the 1990 model year. This was a major evolutionary step.
The most significant change was the move to a full steel body. The removable fiberglass top was gone, replaced with an integrated steel roof and four doors (a two-door model was also offered initially but is much rarer). This created a quieter, more weather-proof, and more structurally rigid vehicle. While some purists lamented the loss of the open-air experience, the vast majority of buyers appreciated the vastly improved refinement.
Underneath, the 2nd gen 4Runner retained the legendary Hilux DNA. It was still built on a robust ladder frame and featured an independent front suspension (a major upgrade from the solid front axle of the early first-gen models) and a solid rear axle with coil springs—a key change from the pickup's leaf springs that provided a much more comfortable ride.
Two engines were offered
- The 22R-E 2.4L 4-cylinder: This engine is a legend in its own right, known for its simplicity, reliability, and ability to run for hundreds of thousands of miles with basic maintenance. While not a powerhouse, its dogged determination is beloved by enthusiasts.
- The 3VZ-E 3.0L V6: This was the
upgraded engine option, offering more horsepower and torque. While it provided a welcome boost in power for highway driving and towing, it also developed a reputation for head gasket issues. However, once properly addressed with modern gaskets and proper maintenance, the 3.0 V6 can be a reliable and long-lasting powerplant.
It was this combination of rugged truck-based construction and newfound passenger comfort that made the 2nd gen 4Runner a massive success. It was the perfect vehicle for a generation of people who wanted to commute to work during the week and escape to the mountains or the beach on the weekend. It was a do-it-all vehicle that rarely, if ever, let its owners down.
Today, the 2nd gen 4Runner has found a new life as a beloved classic. Its simple mechanics, durable construction, and timeless good looks have made it a favorite among off-road enthusiasts, first-time mechanics, and anyone looking for an affordable and capable adventure vehicle. It is a testament to Toyota's engineering philosophy of quality, durability, and reliability. And now, with modern upgrades that solve its few inherent flaws, the legacy of this incredible vehicle is set to continue for decades to come.
Chapter 13: Completing the Vision: Complementary Modifications to Enhance Your Lighting Upgrade
Upgrading your headlights to high-performance LED projectors is the single most impactful lighting modification you can make to your 2nd gen 4Runner. However, to truly modernize your vehicle’s entire lighting system and achieve a cohesive, high-performance setup, there are several complementary upgrades you should consider. This chapter explores other lighting modifications that work in concert with your new headlights to enhance visibility, safety, and style.
#### Upgrading Your Fog Lights
If your 4Runner is equipped with factory fog lights, they suffer from the same outdated halogen technology as the stock headlights. Replacing them with modern LED units is a crucial step in completing your lighting overhaul.
- Why Upgrade? Stock halogen fog lights produce a dim, yellowish light that is largely ineffective in actual fog, rain, or snow. Modern LED fog lights, especially those with a selective yellow color temperature, are far more effective at cutting through inclement weather. They produce a wide, low beam that illuminates the road surface directly in front of the vehicle without causing the reflective glare that makes high beams and even low beams difficult to use in poor conditions.
- What to Look For: Seek out plug-and-play LED fog light assemblies or high-quality LED bulbs designed for fog light housings. Look for options that are DOT or SAE compliant for road-legal use. A selective yellow color (around 3000K) is often preferred for its superior performance in fog and rain.
#### Modernizing Your Tail Lights
The tail lights are just as important for safety as the headlights. They communicate your intentions to other drivers, and the dim, incandescent bulbs in the factory 2nd gen 4Runner tail lights can be difficult to see, especially in bright daylight or adverse weather.
- The LED Advantage: Upgrading to LED tail lights offers several key benefits. They are significantly brighter and illuminate instantly, giving drivers behind you more time to react when you brake. They also have a much longer lifespan than incandescent bulbs and consume less power. Aesthetically, they provide a modern, crisp look that perfectly complements your new LED headlights.
- Upgrade Options: You can choose between simple drop-in LED replacement bulbs or complete aftermarket LED tail light assemblies. Full assemblies often feature modern designs with light pipes or sequential turn signals, offering a more dramatic styling update. Ensure any replacement assembly is DOT/SAE compliant.
#### Interior Lighting Overhaul
The dim, yellow lighting inside the cabin of the 2nd gen 4Runner can make it difficult to read maps, find gear, or simply see what you’re doing at night. A complete interior LED conversion is a simple, inexpensive, and highly effective upgrade.
- Where to Upgrade: You can replace every bulb in your interior with a modern LED equivalent. This includes the dome light, map lights, cargo area light, and the bulbs that illuminate the instrument cluster and climate controls.
- The Result: The interior will be transformed with bright, clear, white light. Finding items in the dark becomes effortless, and the updated instrument cluster lighting makes the gauges easier to read at a glance. This is a quality-of-life upgrade that you will appreciate every single time you get in your 4Runner at night.
#### Don’t Forget the Little Guys: License Plate and Side Marker Lights
To complete the full LED conversion, replace the incandescent bulbs in your license plate lights and side marker lights. This ensures every exterior light on your vehicle is a modern, long-lasting, and efficient LED. It’s a small detail, but it contributes to a clean, cohesive, and fully modernized appearance.
By systematically upgrading all of your vehicle’s lighting systems, you create a complete package that enhances safety, improves functionality, and brings the aesthetics of your classic 2nd gen 4Runner into the modern era. Your new LED projector headlights are the star of the show, and these complementary modifications are the perfect supporting cast.
Chapter 14: More Than a Machine: The 2nd Gen 4Runner Community and Lifestyle
To own a 2nd generation Toyota 4Runner is to be part of something larger than yourself. It’s an unspoken membership in a global community of adventurers, tinkerers, and pragmatists who value reliability and capability above all else. This is not a vehicle for the status-conscious or the tech-obsessed; it is a tool for exploration, a canvas for customization, and a trusted companion for life’s adventures. Understanding this vibrant community and the lifestyle it embodies is key to appreciating why a modification like a headlight upgrade is more than just a practical necessity—it’s a rite of passage.
#### The Digital Campfire: Online Communities and Forums
The heart of the 2nd gen 4Runner community beats strongest in the digital realm. Online forums like Toyota-4Runner.org, T4R.org, and YotaTech are vast repositories of knowledge, containing decades of collective wisdom on every conceivable repair, modification, and troubleshooting scenario. These are the digital campfires where owners gather to share their stories, ask for advice, and celebrate their vehicles.
Owner forums like T4R.org, and Instagram hashtags like #2ndgen4runner or #yotamafia, provide a more visual and immediate connection. Here, you’ll find an endless stream of inspiration: pictures of beautifully restored trucks, videos of incredible off-road feats, and build threads documenting a vehicle’s transformation from a bone-stock daily driver to a purpose-built overland rig.
This online ecosystem is the first place new owners turn when they encounter a problem, like the notoriously dim 4runner headlights. It’s where they learn the difference between a sealed beam and a composite housing, and where they discover that a high-quality, DOT approved 4runner headlight upgrade is the only real solution. The community is a support system, a knowledge base, and a source of inspiration, all rolled into one.
#### The Spirit of DIY
A defining characteristic of the 2nd gen 4Runner owner is a fierce spirit of self-reliance. The vehicle’s simple, robust engineering makes it an ideal platform for the do-it-yourself (DIY) enthusiast. Unlike modern SUVs, which are often a labyrinth of complex electronics and proprietary systems, the 2nd gen 4Runner is refreshingly accessible. Most maintenance and modifications can be performed in a driveway with a decent set of tools and a good service manual (or a quick search on the forums).
This DIY ethos is about more than just saving money. It’s about building a deeper connection with the machine. It’s the satisfaction of successfully completing a repair, the pride in installing a new modification, and the confidence that comes from knowing your vehicle inside and out. When you upgrade your own headlights, you’re not just improving your visibility; you’re adding a chapter to your personal history with the vehicle. You’re leaving your own mark on a legend.
#### A Vehicle for Every Walk of Life
The 2nd gen 4Runner’s versatility is reflected in the diversity of its owners. You’ll find them in every corner of the world and in every walk of life.
- The Weekend Warrior: This owner uses their 4Runner as a daily driver during the week, but come Friday afternoon, they’re loading it up with camping gear and heading for the hills. For them, reliability is paramount. They need a vehicle that will start every time and get them to their remote campsite and back without a fuss.
- The Hardcore Off-Roader: This owner has transformed their 4Runner into a dedicated trail rig, with massive tires, long-travel suspension, and custom armor. They live for the challenge of conquering the most difficult terrain, and they demand the utmost in durability and performance from every component on their vehicle.
- The Overlander: This owner views their 4Runner not just as a vehicle, but as a home on wheels. They have equipped it for long-distance, self-sufficient travel, with rooftop tents, onboard refrigerators, and sophisticated navigation systems. For them, the journey is the destination.
- The Preservationist: This owner is dedicated to maintaining their 4Runner in pristine, factory-original condition. They are a historian and a curator, preserving a piece of Toyota’s legacy for future generations to appreciate.
Despite their different approaches, all these owners are united by a shared appreciation for the 2nd gen 4Runner’s fundamental qualities: its toughness, its simplicity, and its timeless design. And they are all united by the common desire to make this great vehicle even better.
Upgrading the headlights on a 2nd gen 4Runner is a perfect example of this shared ethos. It addresses one of the vehicle’s few significant flaws, it enhances both safety and capability, and it allows each owner to put their own personal stamp on their vehicle. It’s a modification that respects the past while embracing the future—a perfect reflection of the 2nd gen 4Runner itself.