
Stock to Unstoppable: The 2nd Gen 4Runner Off-Road Build Guide.
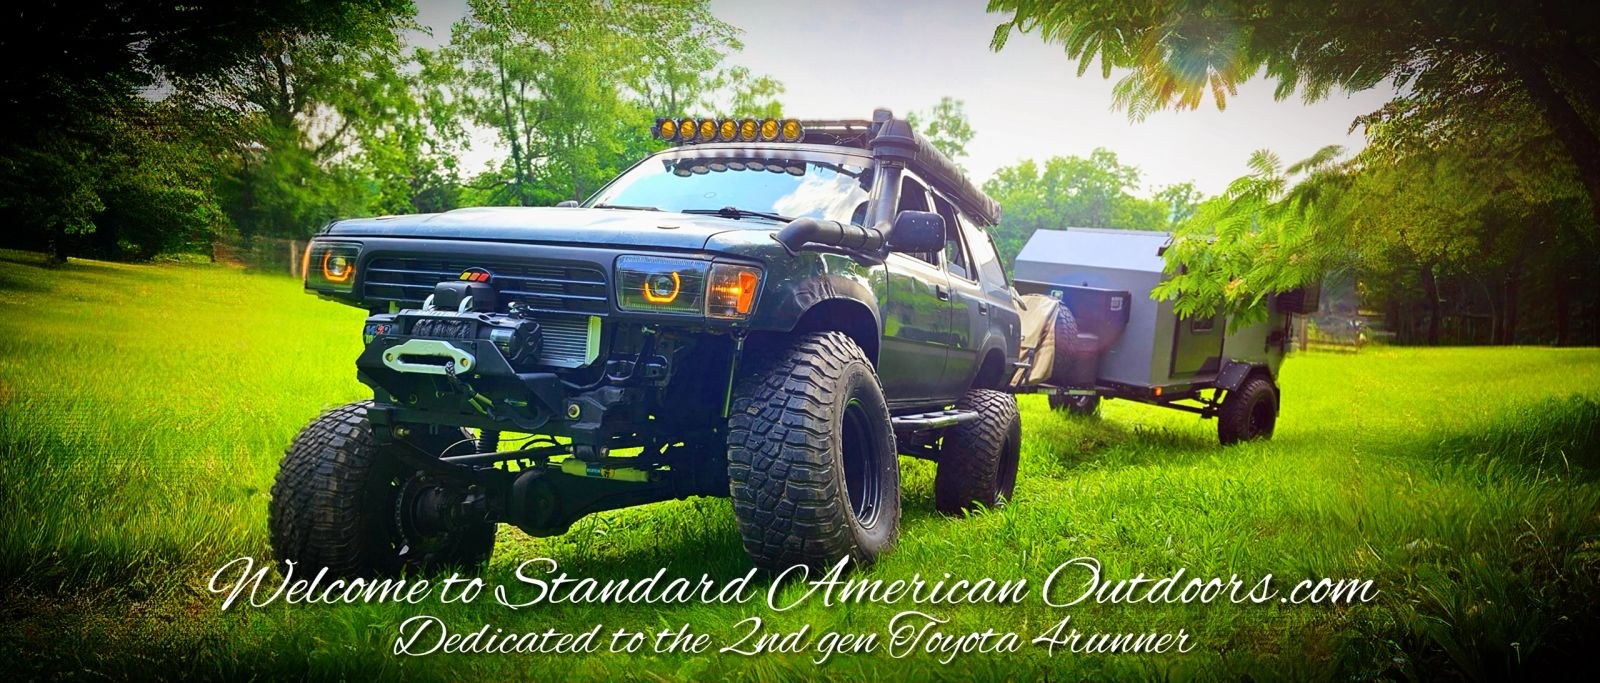
4Runner overland build, off-road modifications, lift kit and tires, ARB locker, rooftop tent setup
You've seen the pictures. The lone 4Runner parked on a remote mountain pass, miles from civilization. The campfire crackling under a blanket of stars, with a rooftop tent silhouetted against the twilight sky. It's the dream that fuels us—the desire to escape the pavement, to leave the crowds behind, and to find those pristine, untouched corners of the world that can only be reached by a truly capable vehicle. You look at your 2nd generation 4Runner, a truck with legendary DNA, and you know it has the potential. But how do you bridge the gap between the stock rig in your driveway and the unstoppable adventure machine in your dreams?Building a capable off-road and overland vehicle can feel overwhelming, a confusing world of lift kits, lockers, and expensive gadgets. But it doesn't have to be. As builders who have transformed these exact trucks from daily drivers into continent-crossing rigs, we can tell you the secret: it's a journey, not a race. It's a logical, phased process of building upon a solid foundation. This is your ultimate blueprint for taking your stock 2nd gen 4Runner and systematically turning it into the unstoppable rig you've always wanted.
The Foundation: Why a Solid Platform Matters More Than Gadgets
Before you spend a single dollar on a fancy light bar or a rooftop tent, you must be brutally honest about the condition of your truck. The most expensive suspension and toughest armor are utterly useless if they are bolted to a rotten frame or powered by a failing engine. The success of your entire build hinges on a mechanically sound, rust-free platform. If you have any doubts, you must first address the core issues of rust and engine reliability. No amount of bolt-on gear can compensate for a weak foundation. A well-maintained, stock 4Runner is infinitely more capable than a lifted, modified rig that's broken down on the side of the trail.
The Phased Approach to Building Your Dream Rig
A capable rig isn't built overnight. The key is to build in logical phases, upgrading the systems that provide the biggest capability gains first. This allows you to grow with your truck, learning its new limits at each stage while spreading the cost over time. We've broken the process down into three distinct phases, taking you from a stock truck to a trail-capable rig, and finally, to a fully self-sufficient overlander.
Phase 1: The "Trail-Capable" Foundation - Lift, Tires, and Armor
This first phase is non-negotiable. These three upgrades work together to provide the ground clearance, traction, and protection that are essential for any serious trail use. This is the foundation upon which your entire build rests.
Step 1: Suspension Lift - The Key to Clearance and Capability
Your first goal is to get the belly of your truck and its vulnerable components away from the rocks. For a 2nd gen 4Runner, the "sweet spot" is a 2-3 inch suspension lift. This provides a significant increase in ground clearance without drastically altering the vehicle's geometry and creating other problems. We strongly recommend a complete, engineered kit from a proven brand like Old Man Emu (OME). These kits include springs and shocks that are designed to work together, providing a balanced and controlled ride. Critically, you must also install a set of aftermarket Upper Control Arms (UCAs). After lifting your truck, the stock UCAs will not allow for proper wheel alignment, leading to poor handling and rapid tire wear.
Step 2: Tires - Where the Rubber Meets the Rocks
With your lift installed, you now have room for the single most important off-road upgrade: bigger, more aggressive tires. Moving up to a 33-inch all-terrain or mud-terrain tire is a game-changer. This upgrade provides a true increase in ground clearance under your axles, which a suspension lift alone cannot do. Look for a tire with a durable, 3-ply sidewall (often designated as Load Range E) to resist punctures from sharp rocks. This is not a place to save money; your tires are your only connection to the trail.
Step 3: Armor - Your Truck's Insurance Policy
Now that you have the clearance and traction to get into more challenging terrain, you need to protect your truck's vital organs. Think of armor as an insurance policy against a catastrophic trail failure. The first three pieces you should invest in are:1.Rock Sliders: These heavy-duty steel sliders bolt directly to the frame and protect your vulnerable rocker panels from being crushed on rocks. They also provide a convenient pivot point for maneuvering around obstacles.2.Front Skid Plate: Protects your engine's oil pan and the front differential.3.Transmission/Transfer Case Skid Plate: Shields the expensive and fragile aluminum housings of your drivetrain from direct impacts.
Phase 2: The "Unstoppable" Drivetrain - Lockers and Gears
With the foundational upgrades complete, you have a capable truck. Phase 2 is about making it truly unstoppable by ensuring the power from your engine can get to the ground in any situation.
The Magic of Lockers: True 4-Wheel Drive
In a stock 4x4 with open differentials, if one front and one rear tire are in the air or on a slippery surface, you are effectively stuck. A locking differential, or "locker," forces both wheels on an axle to turn at the same speed, regardless of traction. This is the difference between walking up an obstacle and spinning your tires helplessly. For ultimate versatility, a selectable air locker, like those from ARB, is the top choice. With the press of a button, you can go from an open differential for street driving to a fully locked axle for maximum trail traction. A 2nd gen 4Runner with a rear locker and 33-inch tires is arguably more capable than a brand-new, unlocked 4Runner off the showroom floor.
Re-Gearing: Getting Your Power Back
Installing larger tires has a side effect: it changes your final drive ratio, making the truck feel even more sluggish than it already is. To get that power back and reduce strain on your engine and transmission, you need to re-gear your differentials. For 33-inch tires, a ratio of 4.88 is the gold standard. This will restore your truck's performance, improve its crawling ability on the trail, and make it much more pleasant to drive on the road.
Phase 3: The "Self-Sufficient" Overlander - Power, Recovery, and Shelter
This phase is for those who dream of multi-day, remote expeditions. It's about building the systems that allow you to live with your rig and get yourself out of trouble, far from help.
Recovery Gear: Getting Yourself Unstuck
Hope is not a recovery strategy. You need the right gear. This starts with a high-quality, 8,000-10,000 lb winch mounted on a sturdy steel front bumper. This is your ultimate self-recovery tool. Supplement this with a set of traction boards (like Maxtrax), a quality recovery strap (not a tow strap!), and a Hi-Lift jack.
On-Board Systems: Air and Power
An onboard air compressor is a must-have for airing your tires down for the trail and back up for the road. It can also be used to run your air lockers. For running a portable fridge, camp lights, and other electronics, a dual battery setup is essential. It isolates your starting battery, ensuring you can always start your engine, no matter how much power your accessories use.
The Overland Setup: Living with Your Rig
This is where you customize the build to your travel style. A rooftop tent (RTT) offers incredible convenience and comfort, while a simple ground tent setup is cheaper and more versatile. A drawer system in the rear cargo area provides organized, rattle-free storage for gear and a platform for a sleeping area or fridge. A 12V fridge/freezer is a game-changer, eliminating the need for messy, wet coolers.
The Final Touches: Snorkels, Lights, and Comms
While not essential, these final touches add a significant degree of safety and capability. A snorkel raises your engine's air intake, providing cleaner air on dusty roads and crucial protection during deep water crossings. Quality LED ditch lights or a light bar can turn a stressful night trail run into a safe and enjoyable experience. Finally, a CB or Ham radio provides reliable communication with other vehicles in your group when you're far outside of cell range.
Build Your Own Adventure
Building a capable 2nd gen 4Runner is a deeply rewarding process. It's a journey of learning, problem-solving, and ultimately, empowerment. Don't be intimidated by the seemingly endless list of potential upgrades. Start with a solid foundation, execute Phase 1, and then see where the trail takes you. Build the truck that suits your style of adventure. The most important step is the first one. Now, get out there and start building.
4Runner overland build, off-road modifications, lift kit and tires, ARB locker, rooftop tent setup